DHIS2 installation on Ubuntu 20.04 LTS – AWS
DHIS2 is compatible with all devices that have a Java JDK, including the most widely used ones like Windows, Linux, and Mac. The PostgreSQL database engine powers DHIS2. DHIS2 can be launched on any Servlet container, including Tomcat and Jetty, as it is packaged as a typical Java Web Archive (WAR-file).
Server specification
2 GB RAM, 1 vCPU
Target: DHIS 2.37
Tomcat: 9, PostgreSQL 12 and Java 11 (OpenJDK 11)
We would like to setup DHIS2 under the /var/www/ directory instead of /home/dhis directory. Before that we created a subdomain mydomain.com and configured virtual host.
Step-1: Basic configuration
1.1 Setting server time zone by invoking the below and following the instructions.
sudo dpkg-reconfigure tzdataCreate a new directory:
sudo mkdir /var/www/mydomain.comIf you found ‘can not create director’ error then please create the following www directory as:
cd /var sudo mkdir www cd ~ Run again:
sudo mkdir /var/www/mydomain.comCreate a new user ‘dhis_tl’
sudo useradd dhis_tl -s /bin/false1.2 Then to set the password for your account invoke:
sudo passwd dhis_tlMake sure you set a strong password with random characters. For this tutorial, I set password ‘123456’.
1.3 Creating the configuration directory: Start by creating a suitable directory for the DHIS2 configuration files. This directory will also be used for apps, files and log files. An example directory could be:
sudo mkdir /var/www/mydomain.com/config1.4 Set ownership of the directory to ‘dhis_tl’ user created above
sudo chown dhis_tl:dhis_tl /var/www/mydomain.com/config Step-2. PostgreSQL installation
2.1 Install PostgreSQL by invoking:
sudo apt-get updatesudo apt-get install postgresql postgresql-contribEnsure that the service is started:
sudo systemctl start postgresql.serviceSee detail: how to Install PostgreSQL on Ubuntu: https://tecadmin.net/install-postgresql-server-on-ubuntu
2.2 Install Postgis:
sudo apt-get install postgis2.3 Create a non-privileged user called dhis_tl by invoking:
sudo -u postgres createuser -SDRP dhis_tl
Enter a secure password at the prompt. I set password ‘123456’. Note: To remember, I set the same username and password for the user and postgres.
2.4 Create a database by invoking:
sudo -u postgres createdb -O dhis_tl dhis2 2.5 The PostGIS extension is needed for several GIS/mapping features to work. DHIS2 will attempt to install the PostGIS extension during startup.
sudo -u postgres psql -c "create extension postgis;" dhis2 If you found ERROR: could not open extension control file “/usr/share/postgresql/14/extension/postgis.control”: No such file or directory
sudo apt-get install postgresql-14-postgis-3-scriptssudo -u postgres psql -c "create extension pg_trgm;" dhis2 Step-3: Database Configuration
3.1. The database connection information is provided to DHIS2 through a configuration file called dhis.conf. As an example this location could be:
sudo -u dhis_tl nano /var/www/mydomain.com/config/dhis.conf A configuration file for PostgreSQL corresponding to the above setup has these properties:
# Hibernate SQL dialect
connection.dialect = org.hibernate.dialect.PostgreSQLDialect

# JDBC driver class
connection.driver_class = org.postgresql.Driver

# Database connection URL
connection.url = jdbc:postgresql:dhis2

# Database username
connection.username = dhis_tl

# Database password
connection.password = 123456

# Database schema behavior, can be validate, update, create, create-drop
connection.schema = update

# Encryption password (sensitive)
encryption.password = xxxx
The encryption.password property is the password used when encrypting and decrypting data in the database. Note that the password must not be changed once it has been set and data has been encrypted as the data can then no longer be decrypted. Remember to set a strong password of at least 24 characters.
Step-4: Java Installation
4.1 To install OpenJDK run below command
sudo apt-get install openjdk-11-jdkNote: The installation directory is /usr/lib/jvm/java-11-openjdk-amd64 which may change depending on the java version. Run below command to check the exact directory:
ls /usr/lib/jvmStep-5: Tomcat and DHIS2 Installation
5.1 Install tomcat 9
sudo apt-get install tomcat9-user 5.1 To create a Tomcat instance for DHIS2 move to the /var/www/mydomain.com folder created above:
cd /var/www/mydomain.com/ 5.2 Create Tomcat instance:
sudo tomcat9-instance-create tomcat-dhis 5.3 Set ownership of the created folder to dhis_tl user
sudo chown -R dhis_tl:dhis_tl /var/www/mydomain.com/tomcat-dhis/ 5.4 Edit setenv.sh:
sudo nano /var/www/mydomain.com/tomcat-dhis/bin/setenv.sh
5.5 Replace all contents by following
#!/bin/sh
#

CATALINA_HOME=/usr/share/tomcat9

# Find the Java runtime and set JAVA_HOME
. /usr/libexec/tomcat9/tomcat-locate-java.sh

# Default Java options
if [ -z "$JAVA_OPTS" ]; then
    JAVA_OPTS="-Djava.awt.headless=true -XX:+UseG1GC"
fi

export JAVA_HOME='/usr/lib/jvm/java-11-openjdk-amd64/'
export JAVA_OPTS='-Xmx2000m -Xms1000m'
export DHIS2_HOME='/var/www/mydomain.com/config'
Note: Please make sure the java installation directory matches the path given in JAVA_HOME above.
Step-6: DHIS2 download
6.1: The next step is to download the DHIS2 WAR file and place it into the webapps directory of Tomcat
Return to root:
cd ~ Download:
sudo wget https://s3-eu-west-1.amazonaws.com/releases.dhis2.org/2.37/dhis.war6.2 Move the WAR file into the Tomcat webapps directory. We want to call the WAR file ROOT.war in order to make it available at localhost directly without a context path:
sudo mv dhis.war /var/www/mydomain.com/tomcat-dhis/webapps/ROOT.war6.3 Replace everything in the file with the following lines:
sudo nano /var/www/mydomain.com/tomcat-dhis/bin/startup.sh #!/bin/sh
set -e
if [ "$(id -u)" -eq "0" ]; then
echo "This script must NOT be run as root" 1>&2
exit 1
fi
export CATALINA_BASE="/var/www/mydomain.com/tomcat-dhis"
/usr/share/tomcat9/bin/startup.sh
echo "Tomcat started"Step-7: Running DHIS2
7.1 DHIS2 can now be started by invoking:
sudo -u dhis_tl /var/www/mydomain.com/tomcat-dhis/bin/startup.sh 7.2 Warning: The DHIS2 server should never be run as root or other privileged user. DHIS2 can be stopped by invoking:
sudo -u dhis_tl /var/www/mydomain.com/tomcat-dhis/bin/shutdown.sh 7.3 To monitor the behavior of Tomcat the log is the primary source of information. The log can be viewed with the following command:
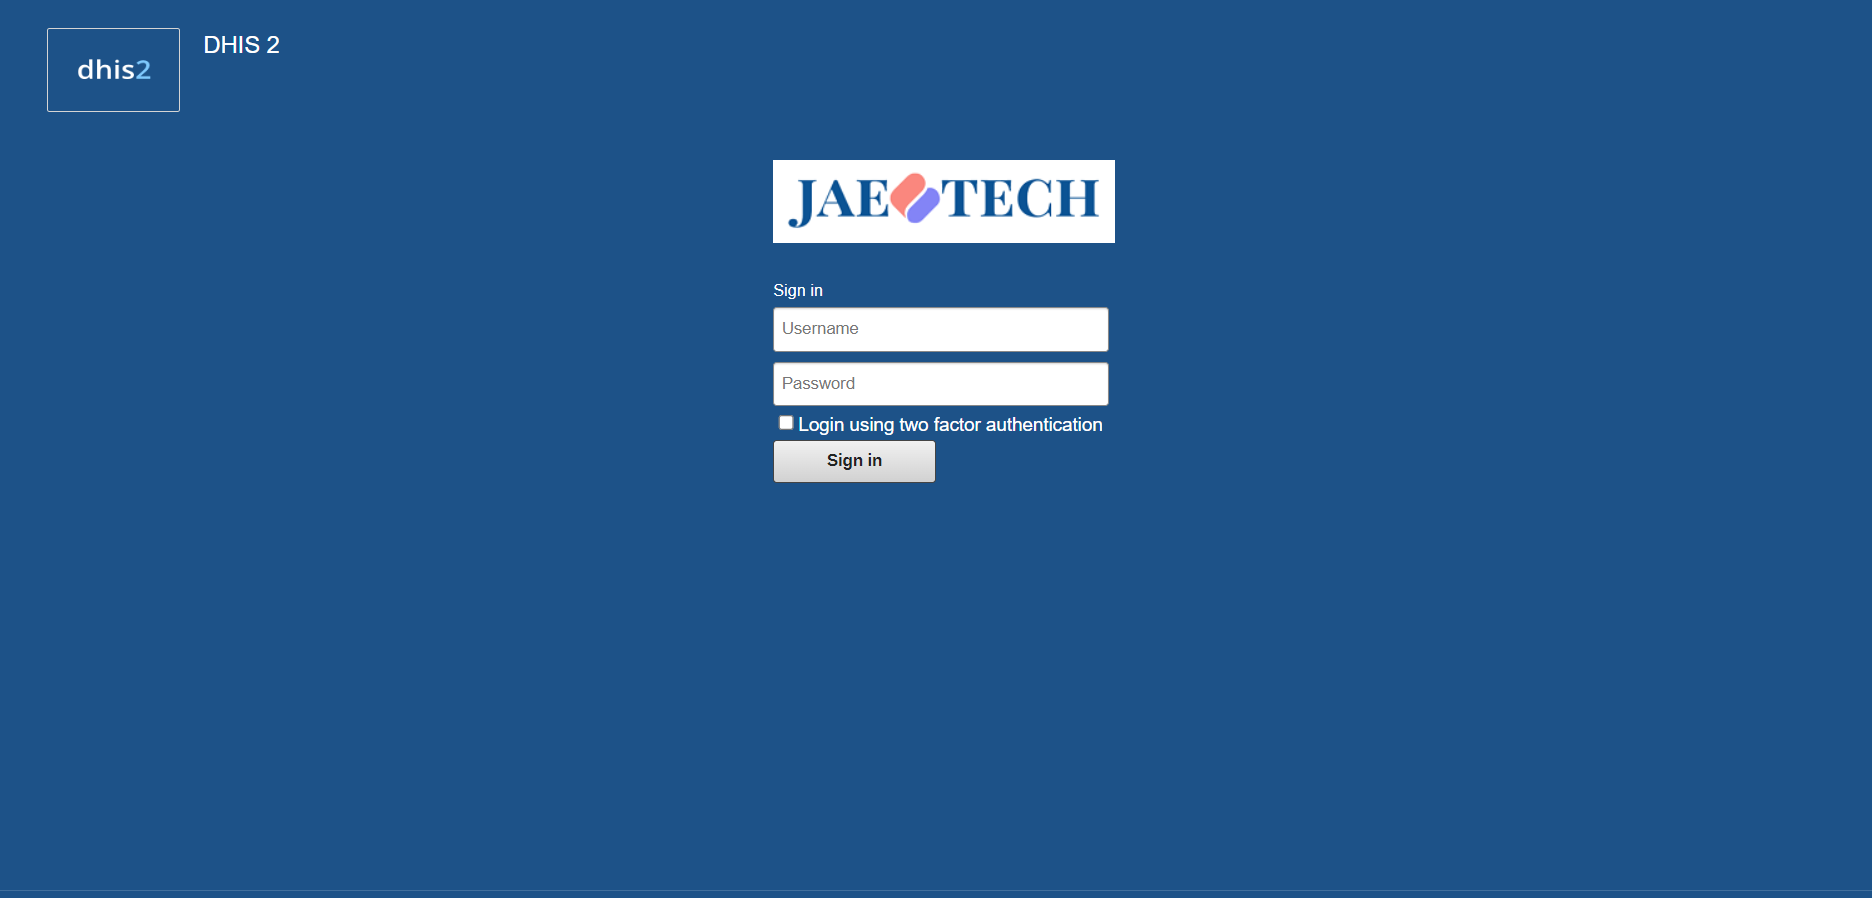
sudo tail -f /var/www/mydomain.com/tomcat-dhis/logs/catalina.out 7.4 Assuming that the WAR file is called ROOT.war, you can now access your DHIS2 instance at the following URL:
https://mydomain.com_or_IP:8080/
Username: admin
Password: district
Remove postgres:
sudo apt-get --purge remove postgresql postgresql-*Restart postgres:
sudo service postgresql restartTo remove system and config files from Ubuntu:
sudo apt remove --purge tomcat9 tomcat9-docs
sudo apt autoremove
sudo apt autoclean
Locate and remove manually the remaining files if there are some:
sudo apt install locate && sudo updatedb
locate tomcat

Amal
July 31, 2023This is the only blog which worked out for me. Much love <3